I Have a Funny Noise Coming From the Speakers on My Pc
Windows 10 has become quite well-known for all the problems and issues that it has brought to computers upon them upgrading to the latest and greatest version of the Windows Operating System. While most of the problems that Windows 10 is known to bring pertain to software, there are a few issues that are hardware-related. One of the most common – and also extremely aggravating – hardware issues that a computer may be affected by upon upgrading to Windows 10 is loud buzzing noises.
Many Windows 10 users have reported that their computers started making weird, loud buzzing noises right after they upgraded to Windows 10. All of the Windows 10 users who have been affected by this problem in the past have clarified that the problem did not exist on the version of Windows that they upgraded to Windows 10 from. In such cases, affected computers' speakers either started making loud buzzing noises upon startup and would only stop making those noises if an audio setting such as volume was changed or simply made loud buzzing noises when the audio was being played, making the audio extremely garbled and, in some cases, completely inaudible.
The culprit behind a computer that has recently been updated to Windows 10 making loud buzzing noises can be anything from corrupted or incorrect audio drivers to incorrect audio settings or anything in between. Thankfully, as long as the cause of this problem in the case of your computer is not related to the hardware (the computer's speakers), you should be able to fix the issue on your own. The following are some of the most effective solutions that can be used to fix a Windows 10 computer that makes loud buzzing noises:
Repair Corrupt System Files
Download and run Restoro to scan and repair corrupt/missing files from here, if files are found to be corrupt and missing repair them and then proceed with the steps below.
Solution 1: Update your audio driver
Right-click on the Start Menubutton to open the WinX Menu. In the WinX Menu, click on Device Manager to open it. In the Device Manager, double-click on the Sound, video and game controllers section to expand it. Double-click on your audio device (Realtek High Definition Audio, for example). Navigate to the Driver.Click on Update Driver…
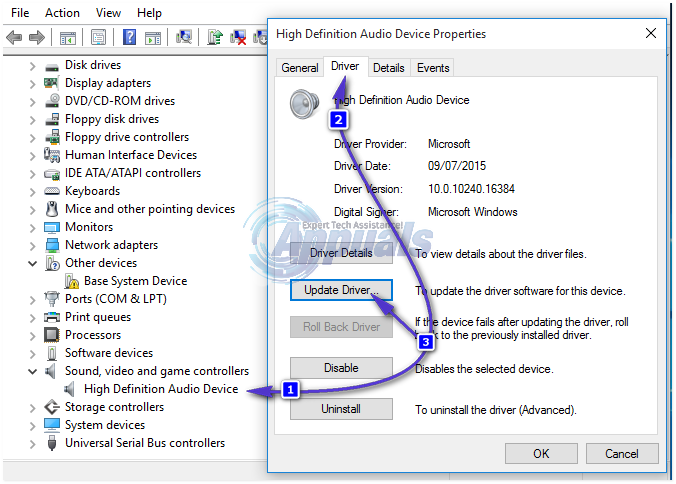
Click on Search automatically for updated driver software. Allow your computer to search the internet for the latest version of your audio driver and, if one is available, install it.

Solution 2: Uninstall your audio device
If updating your audio driver does not fix this issue, you should certainly try uninstalling your audio device altogether. Do not fear, as uninstalling your audio device will not be permanent – your audio device will be detected by your computer and then reinstalled as soon as you restart your computer. To uninstall your audio device, you need to:
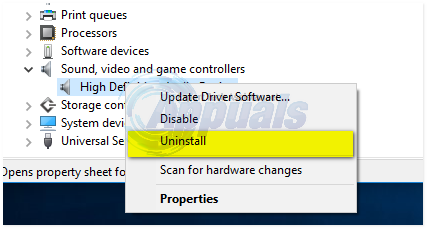
Right-click on the Start Menubutton to open the WinX Menu. In the WinX Menu, click on Device Manager to open it. In the Device Manager, double-click on the Sound, video and game controllers section to expand it. Right-click on your audio device (Realtek High Definition Audio, for example). Click on Uninstall. Confirm the action. This will completely uninstall your computer's audio device.
Restart your computer. As soon as your computer reboots, it should detect and then reinstall your audio device, and this should consequently get rid of the loud and agitating buzzing noises that your computer has been making.
Solution 3: Switch to the generic Windows audio driver
All computers that run on the Windows Operating System come with two audio drivers – the default audio driver from the manufacturer that the computer usually uses, and a generic audio driver from Microsoft. If you face any kinds of problems with the manufacturer's audio driver, you can easily switch to the generic Windows audio driver. To do so, you will need to:
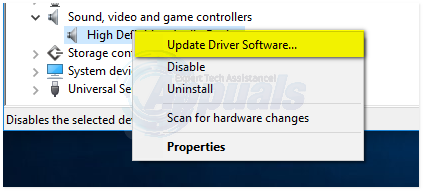
Right-click on the Start Menu button to open the WinX Menu. In the WinX Menu, click on Device Manager to open it. In the Device Manager, double-click on the Sound, video and game controllers section to expand it. Right-click on your audio device (Realtek High Definition Audio, for example) and click on Update Driver Software .
Click on Browse my computer for driver software. Click on Let me pick from a list of device drivers on my computer. Select High Definition Audio Device and click on Next.
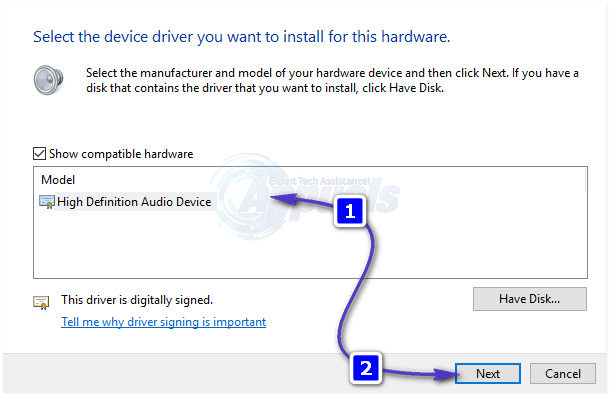
Follow the onscreen instructions to replace their computer's default audio driver with the general Windows High Definition Audio Device.
Solution 4: Disable any and all audio enhancements
Windows offers a wide range of different audio enhancements that can be turned on in order to improve the quality of the audio that your computer treats you to. However, if your computer's speakers are not compatible to or don't agree with the audio enhancements that you turn on, the result may be your computer making loud buzzing noises while playing audio. If your Windows 10 computer only makes buzzing noises when you play audio on it, this solution is definitely worth trying out. To disable audio enhancements for your computer's speakers, you need to:
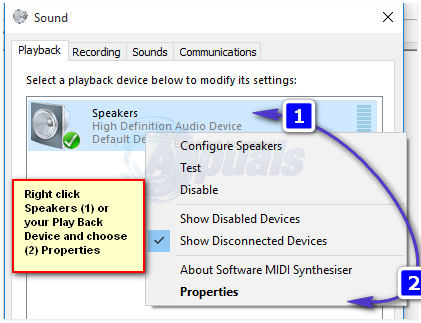
Open the Start Menu. Type Sound into the Search.Click on the search result titled Sound that appears under Control Panel. In the Playback tab, right-click on the playback device that you are using (your computer's speakers, for example) and click on Properties.
Navigate to the Enhancements.Check the Disable all enhancements check box by clicking on it. This will effectively disable any and all audio enhancements that have been applied to your computer's speakers. Click on Apply. Click on OK.
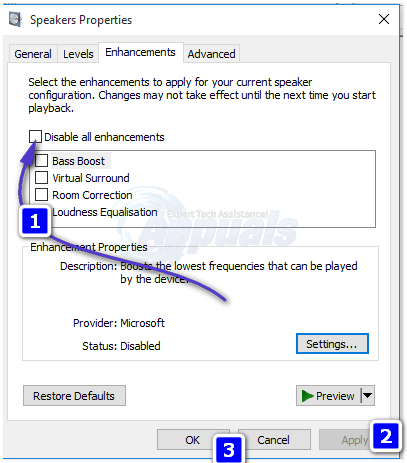
No try and play some audio, and there should no longer be any loud buzzing noises.
Solution 5: Reinitializing Default Audio Device
As suggested by many of our reports this issue is isolated to a software glitch within Windows 10. In some cases, it was reported that a mere reinitialization of the Default Audio Device fixes the issue. Therefore, in this step, we will be reinitializing the Default Audio Device. For that:
- Right–click on the "Speaker" icon in the lower right side of the system tray.
- Select "Sound" and click on the "Playback" tab.
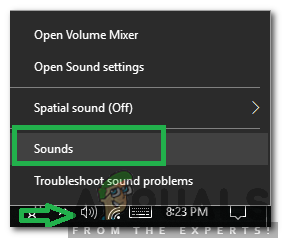
Right-clicking on the Speaker icon and selecting "Sounds" - Right–click on the device that has "Default Device" written below it and select "Disable".
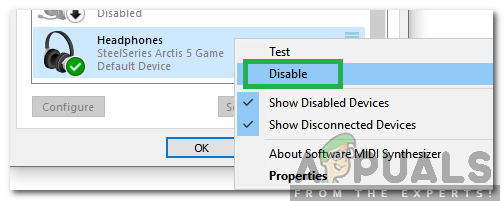
Right-clicking on the Default Device and selecting "Disable" - Right–click on the device again and select "Enable".
- This will reinitialize the device, check to see if the issue persists.
User Suggested Method
What I managed to do was that: lowing the Subwoofer slider on the Sound Properties > Levels (Right click on the sound icon in the task bar). My subwoofer slider was at 100. I put it on 75 and the buzz is basically gone. The lower it is, the les buzz it is, but so is the quality of the subwoofer. I balanced it and the buzz is gone.
![]()
Source: https://appuals.com/windows-10-buzzing-sound/
0 Response to "I Have a Funny Noise Coming From the Speakers on My Pc"
Enregistrer un commentaire